If your interests include data warehousing, travel and architecture then you need to start following Dai Clegg's new blog. Dai was until recently my boss at Oracle, and this blog is part of his legacy, as he encouraged me to start blogging about the database features in JDev so that they could reach a wider audience.
Dai has a great way of linking together concepts from different fields, which often came out in our discussions, and which I'll miss a lot. For example, I don't quite remember how Brunelleschi's dome related to the architecture of the Database API, but somehow it did, and we had a very entertaining conversation about it!
Friday, 21 May 2010
Thursday, 13 May 2010
Copying, Comparing and Reconciling Database Models
Before I talk some more about version control with Subversion, I wanted to demonstrate how JDeveloper can be used to create a copy of an offline database model, as well as compare and reconcile models.
As you might remember from previous posts, the Copy Database Objects to a Project wizard can be used to copy or import database objects from a database to an offline database. This tool can also be used to copy objects from one offline database to another to create a copy of model.
The ROOTS schema lives in an offline database called DATABASE1. I'm going to use the wizard to create a complete copy of that offline database. First I create a new offline database called DATABASE2 by right-clicking on the Offline Database Sources node in the Application Navigator and selecting "New Offline Database...":

Now I right-click on DATABASE2 and select "Copy to Project...". The first thing I need to tell the wizard is where I'm copying objects from (i.e. the source). When I used this wizard before, I picked a database source, but this time I'm going to choose a project and offline database (DATABASE1):

In the next page of the wizard, I choose the target, which is the newly created offline database, DATABASE2:

In the next page, I select the objects I want to copy (let's have all of them):

Finally, I choose to CREATE these objects in the new offline database, since I know it's completely empty:

I press the "Finish" buttton, and a few moments later, the Application Navigator shows that DATABASE2 contains a copy of the ROOTS schema:

To show how model compare and reconcile works, I'm going to work on the copy of the offline database, DATABASE2, removing the ACTIVE column on the ROOTS_USERS table, along with its associated constraint. Once I've done this, I can run the Copy Database Objects to a Project wizard again, choosing the offline database DATABASE1 as my source, and DATABASE2 as my target, and again selecting all the objects. This time, when I get to the "Choose Operation" page of the wizard, I'm going to choose ALTER with Manual Reconcile. Going to the next page shows the reconcile UI:

The DATABASE1 model is on the left hand side, and DATABASE2 is on the right. As you can see, the ACTIVE column and it's associated constraint are missing from DATABASE2. If I wanted to reconcile the models, I could shuttle the ACTIVE column and the constraint over to the right hand side. Unlike the Generate SQL from Database Objects wizard, this wizard will not generate DDL, but will action those changes directly against the target DATABASE2 model.
Tuesday, 4 May 2010
Marginal Boundaries
A friend of mine has been working hard to launch Marginal Boundaries, a quarterly e-zine which specializes in speculative fiction. If you enjoy this kind of writing, check out the first issue, which is now available. There are some excerpts on the site to give you a taste of what's included.
Friday, 30 April 2010
Comparing the Model with the Database
Time for another post before we head into a Holiday weekend here in the UK!
When working with database models, you often want to compare the model with a live database in order to see what's different, and generate ALTER DDL to make your database match the model. JDeveloper 11g has some powerful tools in this area that have matured over a number of releases.
Let's take an example in the Roots project. Right now I'm working on a table called ROOTS_USERS that (unsurprisingly) models users in the system. When users first use the system, they have to register an e-mail address and a password, and optionally load up a picture of themselves. We've already got this working, but we've decided that before users can start adding their family tree, they have to be activated by a system admin user.
To model this, I'm adding a new column to the ROOTS_USERS table, which currently looks like this:

The new ACTIVE column is a simple VARCHAR2 column that can hold the values 'Y' or 'N' (default):

While I'm working in the editor, I can click on the "DDL" tab and see what the DDL would be for a CREATE or UPDATE of the table. The ALTER DDL shown here for UPDATE is produced by comparing the current state of the offline table in the editor with what is stored on disk in the XML file:

I'm also going to add a constraint to enforce that the values for the new ACTIVE column can only be 'Y' or 'N':

I "OK" the dialog and this is what is shown in the Application Navigator:

The ROOTS_USERS icon has a "*" overlay on it to show that it has changed. I'm not going to commit that change back to the subversion repository yet, as it's just one of a number of changes I'm making to the model at the moment, and I want them to be committed together when I'm done. However, I do want to update my local database to reflect this change so that I can test my code.
As I mentioned before, we have some scripts that automatically CREATE the whole Roots schema. I could use those scripts and my change would be included, but that would involve dropping all the tables first, then recreating them before I could test my change. I also have some personal family data in the tables right now that I want to preserve.
So, instead I right click on the ROOTS_USERS table and select "Generate To > SQL Script...":

This is a shortcut into the Generate SQL from Database Objects wizard that I showed in an earlier post. It takes you directly to the page where you decide whether you want to CREATE, REPLACE or ALTER:

I've chosen the ALTER option, ticked the "Manual Reconcile" check box and chosen a database connection. This will present me with some UI that will show the differences between the ROOTS_USERS table in the offline model and the ROOTS_USERS table in that database connection. After pressing the "Next" button, I see this:

There's quite a lot going on here, so let's go through each piece of UI in turn.
The toolbar at the top gives me buttons to navigate directly to the first and last difference, and move to the next and previous difference. There are buttons to choose to accept or revert all changes, and a very useful button to show only the differences.
The tree on the left represents the offline ROOTS_USERS table, and the tree on the right represents the ROOTS_USERS table on the database. Differences between the model and the database are highlighted in the tree on the left. Here I've made a number of other changes to the table which I'm not interested in synchronizing with the database right now, so let's just focus on the new ACTIVE column and the new ROOTS_USERS_CHK1 constraint highlighted in green.
At any level in the tree, I can use the small green arrow buttons to accept a change, which will make that change show up in the right hand tree representing the object in the database. For example, below I've clicked the small green arrow button next to the new ACTIVE column, and it now also appears on the right:

At this point I could press the "Next" button and just action this one change, but as well as creating the new column, I also want to create the new constraint on the database. Constraints reference columns, and to illustrate that the reconcile tool knows this, I've clicked the red cross next to the ACTIVE column to revert that change, and then selected the ROOTS_USERS_CHK1 constraint:

The tool shows that it knows the constraint references a column by highlighting both the column and constraint in darker green. If I want the constraint, then the column must be added as well, and clicking on the green arrow button next to ROOTS_USERS_CHK1 makes both the constraint and the ACTIVE column appear on the right:

I'm now happy with my list of changes to action against the database, so I press "Next", and proceed through the wizard, choosing the name of the SQL script etc. Finally the wizard generates the script, which I run against my local development database using the SQL Worksheet:

Now both the new column and associated constraint are available in the database for me to test my code against.
Once I've finished my batch of changes, I'll need to commit those to the Subversion repository. More on that next time, including dealing with the situation where someone else has modified the same objects that I've been working on!
Friday, 23 April 2010
Database Edition Role
It's been a busy week, and I haven't had time to write about comparing and merging offline database schemas as promised. I'll try to get to that next week. In the meantime, here's a handy tip:
When JDeveloper starts up for the first time you will see a role selection dialog. If you're just using the product for database development, then choose the "Database Edition" role. This just loads the extensions that you will need for working with databases. With this role selected the tool will start up faster and take up less memory.
You can also change the role by going to Tools > Preferences and selecting the Role:

Note that if you change the role, JDeveloper will need to restart.
Monday, 19 April 2010
Oracle JDeveloper 11g Handbook
As part of the appbuild project, we've had to move outside our comfort zones into areas of the product that aren't so familiar to us. Once we finished the database design and started to build the ADF Model, View and Controller layers, many of us bought this book and found it very helpful. It's certainly been next to me on my desk every time I've worked on Roots.
If you need to start learning about JDeveloper 11g and ADF, I would certainly recommend getting yourself a copy. As well as plenty of examples (including a complete demo app), there's a good amount of overview information that ties everything together, including a little history about ADF that explains where it has come from and how much has changed in the 11g release of JDeveloper to make the tool much more powerful and productive for application developers.
If you need to start learning about JDeveloper 11g and ADF, I would certainly recommend getting yourself a copy. As well as plenty of examples (including a complete demo app), there's a good amount of overview information that ties everything together, including a little history about ADF that explains where it has come from and how much has changed in the 11g release of JDeveloper to make the tool much more powerful and productive for application developers.
Friday, 16 April 2010
Generating SQL from the Database Model
We've been working hard on our internal app building project this week, so I thought another blog would be in order to introduce the "Roots" schema, and show how we've set up JDeveloper for team working and generation of SQL from the model.
The idea for Roots came from my recent interest in researching my own family history using a website called ancestry.co.uk. I thought it would be interesting to use JDeveloper and ADF to build something similar, although our ambition level was a little lower given this was a part-time project, and the rest of our time is filled with adding lots of lovely database modeling features to JDev!
We're naturally interested in databases, so we spent a lot of time thinking about the Roots schema and modeling it in JDev. We wanted the schema to be very powerful and flexible, even though we might not have time to implement all the features on top of the model in one go.
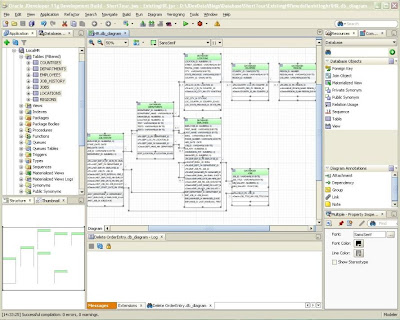
Here's a JPG of the Roots diagram, which I exported from JDev using "Diagram > Publish Diagram":

The basic idea is that Users of the system create Humans that can have different Relationships with each other (Parent-Child, Partner for example). Humans can have different identities over time. For example, my wife was born Astrid Jennings (first Identity). When she married me, she became Astrid Cobb (second Identity). Both Relationships and Identities can be time bound by Events. For example, the default Identity for a Human has an associated birth Event, and a marriage has a beginning Event (and sometimes an end Event).
You'll notice from the diagram that I've chosen to display icons for mandatory columns and columns that participate in constraints. Enable this by selecting a shape on the diagram and then checking the "Show Icons" check box in the Property Inspector under the "Display Options" category. We're not entirely happy with the icons, and it's likely that they'll change in the future, by they are useful for seeing what's important at a glance.
Now let's look at the offline database in the Application Navigator:

Underneath the "Offline Database Sources" node you can see the offline database itself, called "DATABASE1". It's here that you set various options, such as which type of real database the offline database is emulating.
Underneath DATABASE1 you'll see the ROOTS schema, and underneath that the offline objects in the model. Each object is persisted on disk as an XML file. Look at the ROOTS_EVENTS table, and you'll see a number next to it. This is the revision number from Subversion, as we're keeping our offline database schema (along with all of the source for Roots) in a Subversion repository so that everything can be shared by the team.
To pick up schema changes from others, team members refresh their local copy of the offline database from the Subversion repository. Most people are working against a local Oracle XE database for development, so to refresh their personal online database, they need to generate the SQL DDL.
Here I've scrolled the Application Navigator a little to the bottom of the ROOTS schema:

To refresh their local database, all people need to do is right click on the "Generate Roots Script" object and select "Generate". This generates a DDL script for the core database objects from the offline model. They then need to run the "roots_install.sql" file using SQL Worksheet or SQL Plus, which calls the core DDL script, plus some other hand-written scripts to install seed data, and some example data based on the British Royal Family.
Let's see how the "Generate Roots Script" was created.
First I ran the "SQL Generated from Database Objects" wizard from the New Gallery:

The first page allows you to pick where you're generating from. In this case I picked an offline database in the project:

Here you choose whether you want to generate the DDL to a SQL script or direct to the database. Here I opted to generate to a SQL script:

Next I selected all the objects in the schema that I want to generate:
 The Operations page is where you choose whether to CREATE, REPLACE or ALTER the objects that you've chosen to generate. In this case, I want a CREATE DDL script:
 This page allows me to choose some options for the SQL script, such as its name and location. Notice that we consider the script to be a derived object, so it goes into the classes directory along with artefacts like compiled Java classes:

Finally I choose to save the settings, and provide a name and location for the file. This is the magic that allows me to run this whole process again by simply right clicking on the "Generate Roots Script" object in the Application Navigator:

That's all I have time for today. In future posts we'll look more at team working using Subversion source control, and some of the other options you saw in the generate wizard. In particular the powerful visual reconcile feature that can be used when you use the ALTER option and compare the model with the online database.
The idea for Roots came from my recent interest in researching my own family history using a website called ancestry.co.uk. I thought it would be interesting to use JDeveloper and ADF to build something similar, although our ambition level was a little lower given this was a part-time project, and the rest of our time is filled with adding lots of lovely database modeling features to JDev!
We're naturally interested in databases, so we spent a lot of time thinking about the Roots schema and modeling it in JDev. We wanted the schema to be very powerful and flexible, even though we might not have time to implement all the features on top of the model in one go.
Here's a JPG of the Roots diagram, which I exported from JDev using "Diagram > Publish Diagram":

The basic idea is that Users of the system create Humans that can have different Relationships with each other (Parent-Child, Partner for example). Humans can have different identities over time. For example, my wife was born Astrid Jennings (first Identity). When she married me, she became Astrid Cobb (second Identity). Both Relationships and Identities can be time bound by Events. For example, the default Identity for a Human has an associated birth Event, and a marriage has a beginning Event (and sometimes an end Event).
You'll notice from the diagram that I've chosen to display icons for mandatory columns and columns that participate in constraints. Enable this by selecting a shape on the diagram and then checking the "Show Icons" check box in the Property Inspector under the "Display Options" category. We're not entirely happy with the icons, and it's likely that they'll change in the future, by they are useful for seeing what's important at a glance.
Now let's look at the offline database in the Application Navigator:

Underneath the "Offline Database Sources" node you can see the offline database itself, called "DATABASE1". It's here that you set various options, such as which type of real database the offline database is emulating.
Underneath DATABASE1 you'll see the ROOTS schema, and underneath that the offline objects in the model. Each object is persisted on disk as an XML file. Look at the ROOTS_EVENTS table, and you'll see a number next to it. This is the revision number from Subversion, as we're keeping our offline database schema (along with all of the source for Roots) in a Subversion repository so that everything can be shared by the team.
To pick up schema changes from others, team members refresh their local copy of the offline database from the Subversion repository. Most people are working against a local Oracle XE database for development, so to refresh their personal online database, they need to generate the SQL DDL.
Here I've scrolled the Application Navigator a little to the bottom of the ROOTS schema:

To refresh their local database, all people need to do is right click on the "Generate Roots Script" object and select "Generate". This generates a DDL script for the core database objects from the offline model. They then need to run the "roots_install.sql" file using SQL Worksheet or SQL Plus, which calls the core DDL script, plus some other hand-written scripts to install seed data, and some example data based on the British Royal Family.
Let's see how the "Generate Roots Script" was created.
First I ran the "SQL Generated from Database Objects" wizard from the New Gallery:

The first page allows you to pick where you're generating from. In this case I picked an offline database in the project:

Here you choose whether you want to generate the DDL to a SQL script or direct to the database. Here I opted to generate to a SQL script:

Next I selected all the objects in the schema that I want to generate:
 The Operations page is where you choose whether to CREATE, REPLACE or ALTER the objects that you've chosen to generate. In this case, I want a CREATE DDL script:
 This page allows me to choose some options for the SQL script, such as its name and location. Notice that we consider the script to be a derived object, so it goes into the classes directory along with artefacts like compiled Java classes:
Finally I choose to save the settings, and provide a name and location for the file. This is the magic that allows me to run this whole process again by simply right clicking on the "Generate Roots Script" object in the Application Navigator:

That's all I have time for today. In future posts we'll look more at team working using Subversion source control, and some of the other options you saw in the generate wizard. In particular the powerful visual reconcile feature that can be used when you use the ALTER option and compare the model with the online database.
Thursday, 15 April 2010
Online Database Modeling
A new feature in JDeveloper 11g that we're pretty excited about is the ability to build database models directly from the database, without reverse engineering into a project first.
This feature first saw the light of day when we talked to someone who is a long-time database developer, but in no way a database modeler (at least he wouldn’t describe himself as such). However, the whiteboard in his office had a database model on it, so we asked him how come. He said that the first thing he does when he gets his hands on a new database is to draw the picture of it, mostly just to understand it, and partly as an aide memoir while he’s working on it.
We told him that he could reverse engineer it into JDev and draw the picture that way. When he replied, there was a note in his voice that told us he just wasn’t going to do that, even though it’s easy enough to do (reference my last Quick Tour posting).
It’s hard sometimes to talk about features in your product without crossing the line from enthusing about the cool bits to wingeing about why users don’t love your product as much as you do, but we needed to get this right in our minds. What we concluded was that as far as he was concerned the database is the single source of truth, not some XML files nor a picture on his whiteboard. The reason he found the picture on the whiteboard acceptable and a model in JDev not was simply that no-one was going to mistake a whiteboard hand drawing for the single source of truth, but they might a JDev project. You’d have to count me in that category. A JDev project is where I keep my source code and it’s where I keep my database design. For me, generating DDL and running it is the same as compiling my code and deploying my application (well not quite, but you get the picture).
But that’s not the point. The point is that for some people the way JDeveloper, and all database design tools, work is just plain wrong! The database is king. So that’s when we conceived of a diagram built not of metadata objects but directly on the database catalog that contains the same metadata. Instant visualization (the problem to be solved) without file-based metadata (the situation to be avoided).
The two scenarios look like this:

In Scenario 2, it’s conceivable I may not even save the diagram. If I created it just to understand the foreign keys then once I’ve done that I might just delete the diagram. However, I could also save it safely because whenever it is opened it will attempt to synchronize with the database, and if it can’t, it won’t display, so my database single source of truth is still king.
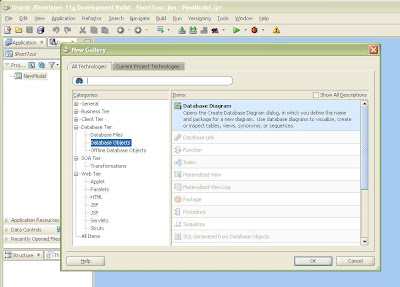
I covered Scenario 1 in the Quick Tour in my last post, so let’s just run through Scenario 2 with the tool. First I create a new diagram, which I do in the context of a project, because if I choose to save the diagram, that’s where it will go:

Then I need to connect to the database I’m going to model:

Again, I’m using the shipped HR demo schema in my XE database.
I browse down the database connection to the tables I want to model, select them and drag them onto the diagram.
When I do that the tool asks if I want to reverse engineer and then build the diagram, or if I want to leave them in the database and model them there:

And that’s it:

I’ve cheated a little here, and captured the diagram when I’d done my custom tidy up, as described in the Quick Tour, but that’s it.
It takes a little longer to open a connected model diagram because it has to query from the database to check the diagram is in sync, and I recommend you put a note on the diagram to say it is an online model because you can edit it and it changes the catalog directly by generating an ALTER TABLE when you "OK" the editor. That has all the restrictions you’d expect if you applied the same ALTER TABLE in SQLPlus, but here it’s generated for you.
Let’s see that in action. Edit a table and add a column:

"OK" the dialog and refresh the Database Navigator view (control at the top of the pane) to see the added column:

Now drop the column in the Database Navigator and refresh the diagram (Menu > View > Refresh) and it’s gone.
Some people who have seen this regard it as a dangerous tool. Well, so is a chain saw, but you try taking a tree down without one! In reality, this is no more dangerous than the SQL Worksheet in JDeveloper and it can be more convenient. It’s just another tool in the toolbox. Hope it helps.
While building our "Roots" genealogy app, we haven't used online modeling very much, as for us the model in the offline database is king. This is because we're working in a team, and want to source control all the application artefacts in Subversion, including the schema itself. Changes to the schema are made in the offline database and checked into Subversion. Team members can then pick up those changes and generate the DDL to refresh their local schemas (most of us are working against local instances of Oracle XE). We also have some powerful tools to compare different versions of the offline objects, and to compare the model with objects in the online database. I'll be going into more detail on that in my next post.
This feature first saw the light of day when we talked to someone who is a long-time database developer, but in no way a database modeler (at least he wouldn’t describe himself as such). However, the whiteboard in his office had a database model on it, so we asked him how come. He said that the first thing he does when he gets his hands on a new database is to draw the picture of it, mostly just to understand it, and partly as an aide memoir while he’s working on it.
We told him that he could reverse engineer it into JDev and draw the picture that way. When he replied, there was a note in his voice that told us he just wasn’t going to do that, even though it’s easy enough to do (reference my last Quick Tour posting).
It’s hard sometimes to talk about features in your product without crossing the line from enthusing about the cool bits to wingeing about why users don’t love your product as much as you do, but we needed to get this right in our minds. What we concluded was that as far as he was concerned the database is the single source of truth, not some XML files nor a picture on his whiteboard. The reason he found the picture on the whiteboard acceptable and a model in JDev not was simply that no-one was going to mistake a whiteboard hand drawing for the single source of truth, but they might a JDev project. You’d have to count me in that category. A JDev project is where I keep my source code and it’s where I keep my database design. For me, generating DDL and running it is the same as compiling my code and deploying my application (well not quite, but you get the picture).
But that’s not the point. The point is that for some people the way JDeveloper, and all database design tools, work is just plain wrong! The database is king. So that’s when we conceived of a diagram built not of metadata objects but directly on the database catalog that contains the same metadata. Instant visualization (the problem to be solved) without file-based metadata (the situation to be avoided).
The two scenarios look like this:
- Scenario 1: Reverse engineer from the database catalog into a JDeveloper project and then create a diagram of the offline metadata.
- Scenario 2: Create the diagram directly from the metadata in the database catalog. There is no offline metadata (apart from the diagram itself, if I choose to save it).

In Scenario 2, it’s conceivable I may not even save the diagram. If I created it just to understand the foreign keys then once I’ve done that I might just delete the diagram. However, I could also save it safely because whenever it is opened it will attempt to synchronize with the database, and if it can’t, it won’t display, so my database single source of truth is still king.
I covered Scenario 1 in the Quick Tour in my last post, so let’s just run through Scenario 2 with the tool. First I create a new diagram, which I do in the context of a project, because if I choose to save the diagram, that’s where it will go:
Then I need to connect to the database I’m going to model:

Again, I’m using the shipped HR demo schema in my XE database.
I browse down the database connection to the tables I want to model, select them and drag them onto the diagram.
When I do that the tool asks if I want to reverse engineer and then build the diagram, or if I want to leave them in the database and model them there:

And that’s it:

I’ve cheated a little here, and captured the diagram when I’d done my custom tidy up, as described in the Quick Tour, but that’s it.
It takes a little longer to open a connected model diagram because it has to query from the database to check the diagram is in sync, and I recommend you put a note on the diagram to say it is an online model because you can edit it and it changes the catalog directly by generating an ALTER TABLE when you "OK" the editor. That has all the restrictions you’d expect if you applied the same ALTER TABLE in SQLPlus, but here it’s generated for you.
Let’s see that in action. Edit a table and add a column:

"OK" the dialog and refresh the Database Navigator view (control at the top of the pane) to see the added column:

Now drop the column in the Database Navigator and refresh the diagram (Menu > View > Refresh) and it’s gone.
Some people who have seen this regard it as a dangerous tool. Well, so is a chain saw, but you try taking a tree down without one! In reality, this is no more dangerous than the SQL Worksheet in JDeveloper and it can be more convenient. It’s just another tool in the toolbox. Hope it helps.
While building our "Roots" genealogy app, we haven't used online modeling very much, as for us the model in the offline database is king. This is because we're working in a team, and want to source control all the application artefacts in Subversion, including the schema itself. Changes to the schema are made in the offline database and checked into Subversion. Team members can then pick up those changes and generate the DDL to refresh their local schemas (most of us are working against local instances of Oracle XE). We also have some powerful tools to compare different versions of the offline objects, and to compare the model with objects in the online database. I'll be going into more detail on that in my next post.
Tuesday, 13 April 2010
Database Modeling in JDeveloper: A Quick Tour
I'm finally getting around to implementing a New Year's resolution to start blogging about the Database features in Oracle's JDeveloper product. I know it's April already, but better late than never!
If you've been following blogs from other JDev staffers, you'll know that we're all currently working in teams using our own product to build various applications. This is helping us learn more about the product outside our own areas of expertise, as well as identify bugs and enhancements to make the product better.
I'm working on a team that's building a genealogy app to record your family tree. It has the catchy name of "Roots". As part of our regular work, all of the Roots team members work on the Database features in JDev, so the early part of the project involved heavy use of our own features to design the database schema.
What spurred me to start this blog was the discovery, from a number of conversations and observations, that quite a surprising proportion of Oracle Java/Database developers didn’t actually realize JDeveloper has database modeling, so I'll start with a quick introduction, with drill-down in future posts.
The two main start points for a database model are reverse-engineering from the database or built ‘top-down’ from the analysis of requirements. Top-down modeling often starts with an abstract, or logical data model in ERD or UML or some other modeling syntax before transforming to a database design for refinement and the addition of physical aspects of the model (such as indexing etc) . JDeveloper supports both, including logical modeling, but that’s a subject for another day. Let’s look at building a simple model from scratch.
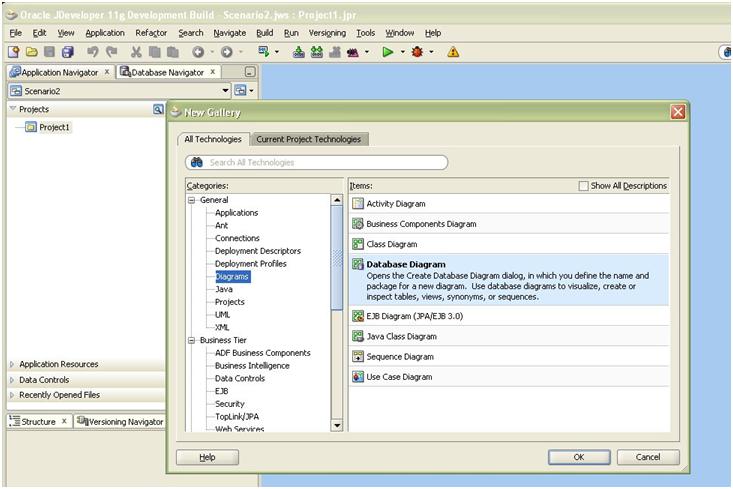
To create a new database model in JDev, you use the New Gallery (I already created myself a new application & generic project):
There’s a clue in the newly create diagram as to what you do next! I’ll just build a classic 4-table order entry model. I click on the table icon in the component palette & drag it onto the diagram.
For the first object I create, I need to choose whether I want my model to be immediately implemented in the database as I build it, or whether my model should be stored as metadata to be generated to the database later. I’m going to choose the latter option because that way I can maintain versions of my model as it evolves in a repository. I’ll also choose the database I’m going to implement in the next page of the dialog:

I create the other tables in the same drag-and-drop way. Double click on a table to get the dialog to add columns, PKs, indexes etc. Some designers add the columns first then hook up the foreign keys between them in the table dialog:

JDeveloper also lets me drag and drop a foreign key from the component palette; click on the ‘many’ end first then the ‘one’ end. The mini-dialog will suggest a new column or columns to use at the ‘many’ end to represent the primary key of the ‘one’ end. You can accept that to create the columns for you or pick an existing column.

And that’s pretty much it, but notice I can choose UML or ERD notation for the FKs. As an option in the Property Inspector (View > Property Inspector if it isn’t already showing), I switched to ERD here:

I’m now ready to generate and run the DDL. All I need for that is a connection to the target database, which I can create in the Database Navigator:

You can create connections to many different database types (e.g. MySQL, DB2, Microsoft SQL Server). I’m sticking with the Oracle XE installed on my laptop. As I go through the Generate Wizard I can override the defaults. Make sure the schema is what you want it to be (it defaults from the package that contains your modeled elements). Here's my database implemented:

You can have the Generator just run the DDL or you can save it to run later. I just generated and ran it, but here’s a fragment of the generated DDL just for completeness:

I could have used a template table, for example to add the same audit columns to every table or to add a surrogate key (with a sequence & trigger to populate it automatically created). There is also reporting and querying so you can do quality checking up front (e.g. list all tables with no PK), and all the colours and fonts are configurable. In addition, there’s a range of tools for adding notes & comments & links to your diagram, and tools for auto-layout, alignment etc. Athough I’ve only built tables here I can model views procedures, triggers, and more.

But I’m a bit obsessive about straight lines and about the many ends always being to the left and using bigger boxes for tables with more columns, keys and constraints to show, so let’s tidy this up.
I resize all the tables so that will display all their columns, keys and constraints (select a table, RMB, select all this type, RMB, "Optimize Shape Size > Height and Width") and re-lay them out – I prefer the left to right option, but you can play with all the options in the auto-layout drop down in the diagram toolbar, including laying out part of a diagram (by selecting the objects to be laid out). If you select none you get the whole diagram laid out:
Then I stretch a few tables so they can all connect up with straight lines. Then I select all the FKs. The easiest way to do that is to select any one FK & there’s a RMB menu item to "Select All of this Type". There’s also an option to "Straighten Lines" (select a line, RMB, "Straighten Lines"). Here is the result (with ERD notation again, just for consistency):

I realize I’ve left a few loose threads here (e.g. logical modeling, templates, reporting, repository, modeling the database itself and more realistic models – not just a few tables). I’ll be coming back to those and others in future posts.
If you've been following blogs from other JDev staffers, you'll know that we're all currently working in teams using our own product to build various applications. This is helping us learn more about the product outside our own areas of expertise, as well as identify bugs and enhancements to make the product better.
I'm working on a team that's building a genealogy app to record your family tree. It has the catchy name of "Roots". As part of our regular work, all of the Roots team members work on the Database features in JDev, so the early part of the project involved heavy use of our own features to design the database schema.
What spurred me to start this blog was the discovery, from a number of conversations and observations, that quite a surprising proportion of Oracle Java/Database developers didn’t actually realize JDeveloper has database modeling, so I'll start with a quick introduction, with drill-down in future posts.
The two main start points for a database model are reverse-engineering from the database or built ‘top-down’ from the analysis of requirements. Top-down modeling often starts with an abstract, or logical data model in ERD or UML or some other modeling syntax before transforming to a database design for refinement and the addition of physical aspects of the model (such as indexing etc) . JDeveloper supports both, including logical modeling, but that’s a subject for another day. Let’s look at building a simple model from scratch.
To create a new database model in JDev, you use the New Gallery (I already created myself a new application & generic project):

There’s a clue in the newly create diagram as to what you do next! I’ll just build a classic 4-table order entry model. I click on the table icon in the component palette & drag it onto the diagram.
For the first object I create, I need to choose whether I want my model to be immediately implemented in the database as I build it, or whether my model should be stored as metadata to be generated to the database later. I’m going to choose the latter option because that way I can maintain versions of my model as it evolves in a repository. I’ll also choose the database I’m going to implement in the next page of the dialog:

I create the other tables in the same drag-and-drop way. Double click on a table to get the dialog to add columns, PKs, indexes etc. Some designers add the columns first then hook up the foreign keys between them in the table dialog:

JDeveloper also lets me drag and drop a foreign key from the component palette; click on the ‘many’ end first then the ‘one’ end. The mini-dialog will suggest a new column or columns to use at the ‘many’ end to represent the primary key of the ‘one’ end. You can accept that to create the columns for you or pick an existing column.

And that’s pretty much it, but notice I can choose UML or ERD notation for the FKs. As an option in the Property Inspector (View > Property Inspector if it isn’t already showing), I switched to ERD here:

I’m now ready to generate and run the DDL. All I need for that is a connection to the target database, which I can create in the Database Navigator:

You can create connections to many different database types (e.g. MySQL, DB2, Microsoft SQL Server). I’m sticking with the Oracle XE installed on my laptop. As I go through the Generate Wizard I can override the defaults. Make sure the schema is what you want it to be (it defaults from the package that contains your modeled elements). Here's my database implemented:

You can have the Generator just run the DDL or you can save it to run later. I just generated and ran it, but here’s a fragment of the generated DDL just for completeness:

I could have used a template table, for example to add the same audit columns to every table or to add a surrogate key (with a sequence & trigger to populate it automatically created). There is also reporting and querying so you can do quality checking up front (e.g. list all tables with no PK), and all the colours and fonts are configurable. In addition, there’s a range of tools for adding notes & comments & links to your diagram, and tools for auto-layout, alignment etc. Athough I’ve only built tables here I can model views procedures, triggers, and more.

But I’m a bit obsessive about straight lines and about the many ends always being to the left and using bigger boxes for tables with more columns, keys and constraints to show, so let’s tidy this up.
I resize all the tables so that will display all their columns, keys and constraints (select a table, RMB, select all this type, RMB, "Optimize Shape Size > Height and Width") and re-lay them out – I prefer the left to right option, but you can play with all the options in the auto-layout drop down in the diagram toolbar, including laying out part of a diagram (by selecting the objects to be laid out). If you select none you get the whole diagram laid out:

Then I stretch a few tables so they can all connect up with straight lines. Then I select all the FKs. The easiest way to do that is to select any one FK & there’s a RMB menu item to "Select All of this Type". There’s also an option to "Straighten Lines" (select a line, RMB, "Straighten Lines"). Here is the result (with ERD notation again, just for consistency):

I realize I’ve left a few loose threads here (e.g. logical modeling, templates, reporting, repository, modeling the database itself and more realistic models – not just a few tables). I’ll be coming back to those and others in future posts.
Subscribe to:
Posts (Atom)